Generating documentation
There are probably three main levels of documentation for your code.
Readme.md: This is non negotiable! Although it is acceptable in simple cases to essentially put all the documentation in the readme, in general it is better practice for the readme to be ‘short and sharp’ and provide detailed documentation elsewhere. See here for a good template.
Comments and docstrings in your code! These can also be incorporated into your general documentation using sphinx.
Detailed documentation and examples. This can be done a number of ways; you could:
add some jupyter notebooks to your repository inside an examples folder
Generate html documentation with Sphinx, which is what we will do below
Use the wiki section of your github repository (although almost no one actually does this!)
Create README.md
Inside DemoPythonProject, create a file called README.md and copy the below into it:
# DemoPythonProject

**Author:** *{{ Your Name }}*

*Give a brief summary of the purpose of the code and what it does.*

## Setup/Build/Install

For a properly package python package that is released on PyPi, the answer would be:
```
pip install DemoPythonProject
```

## Usage

See [our documentation](link)

## Directory Structure

- **DemoPythonProject** Source code
- **examples** examples of how to use
- **docsrc** source documentation
- **docs** html documentation generated with sphinx
Code comments and doc strings
Whenever you write a new function, it’s a good idea to add a docstring to the top of it like this:
def add_two_floats(parameter1, parameter2):
    """
    This is the docstring for some_function!
    At a minimum, the docstring should state what the goal of the function is.
    Ideally, it should also describe the inputs and outputs like this:

    :param parameter1: first number to be added
    :type parameter1: float
    :param parameter2: second number to be added
    :type parameter2: float
    :return: sum of parameter1 and parameter2
    """
    return float(parameter1) + float(parameter2)
This docstring is written in the rst format. The commonly used formats for writing docstrings are described here. Although you don’t have to use one of these formats (the docstring can contain any text) it’s probably a good habit to get into, because as you will see below it makes automating documentation generation very easy.
A good tip for docstrings is that you should aim to describe what the function is supposed to do, but not how it does it. This is because the ‘how’ part often tends to change, and anyway if anyone really cares to know they can look through the code.
Detailed documentation and examples
Ideally, the code readme is like the abstract of the paper: it should give someone a quick overview of what the code does and how it works, but only for the very simplest of codes will it be sufficient by itself. For writing more advanced documentation, you have multiple options:
Write a series of jupyter notebook. Jupyter combines code and markdown. Everyone has already heard me complaining about what a bad development tool it is, but it’s actually excellent for writing documentation. So you could just write all your examples in jupyter notebooks, and this would be an acceptable solution
Use the built-in ‘wiki’ of your github repository. This allows you to host multiple documents written in markdown, just like the readme is
Set up sphinx to transform your markdown or rst documents into html that you can host. Sphinx has a number of advantages:
It looks way more professional than the other options.
Sphinx is specifically designed to generate documentation websites that are easy to read and navigate
Html is incredibly flexible and once you have a hosted webpage you can start to some some pretty cool things (e.g see the plotly library)
Sphinx can scan your code and generate code documentation directly from it - super cool!
Setting up sphinx
Setting up sphinx from scratch can be slightly painful, but luckily for you you will never have to do it! just either copy the docsrc folder from this repository into your own repository, or else use this template (only available to U.Syd members) when creating your repository.
Generating sphinx html
Note: we assume you have already installed the libraries. If not, go here
To generate sphinx html, from the command line navigate to the docsrc folder and type
make github
# or on windows
./make github
This will create a folder called docs. You can take a look at docs/index.html - this is going to be the ‘home’ page for your documentation. Right now, it probably doesn’t look that useful since it doesn’t reflect your actual project, so read on!
Updating the docsrc to actually reflect your code!
Whether you copied the docsrc folder from this project, or used the template, at the moment, your docs don’t reflect you actual project. Luckily, updating them is pretty simple. Inside the docsrc folder, open up the index.rst file. This is the ‘root’ of your documentation. You can see it has a basic preamble, then simply links to other files. To update the docs, you simply have to change this intro/ preamble, then update the index section to point to your new docs.
Markdown versus RST
You will notice that some of the docsrc files end with *.rst (reStructured Text) and some end with *.md (markdown). What are these?
Both are plain text files with a certain structure. rst is the default language for writing sphinx docs, while markdown is what is used in your github readme for instance. I prefer writing my docs in markdown, but either (or both!) are fine. There are many many resources online to help with both rst and markdown.
setting up sphinx to scan your code base and automatically generate docs
One thing that sphinx can do which is really cool is automatically generate documentation directly from your code. This only works if you write docstrings for your code, which of course we all do…right…right?
take a look at the last entry in the index.rst file (around line 49): this points to a file called /code_docs.rst. Open this file up; it looks like this:
Code Documentation
==================

sine_wave_utilities
-------------------

.. automodule:: MyPackage.sine_wave_utilities
   :members:
This directive tells sphinx to automatically generate documentation based on whatever it finds in the docstrings of “MyPackage.sine_wave_utilities”, which of course is the demo code included in this repository. The rest just works, because
I wrote docstrings for my code
in the docsrc/conf.py file, I added a line such that sphinx will be able to find this code. You shouldn’t actually need to change this line, but just so you know it’s there. In general, this conf.py file controls nearly everything about sphinx.
sys.path.insert(0, os.path.abspath('..'))
# this line inside conf.py makes sure sphinx will be able to find our module
hosting sphinx html with github
OK: finally you got your documentation looking the way you like it. Make sure you add and commit everything in docs to git, then push the changes to github.
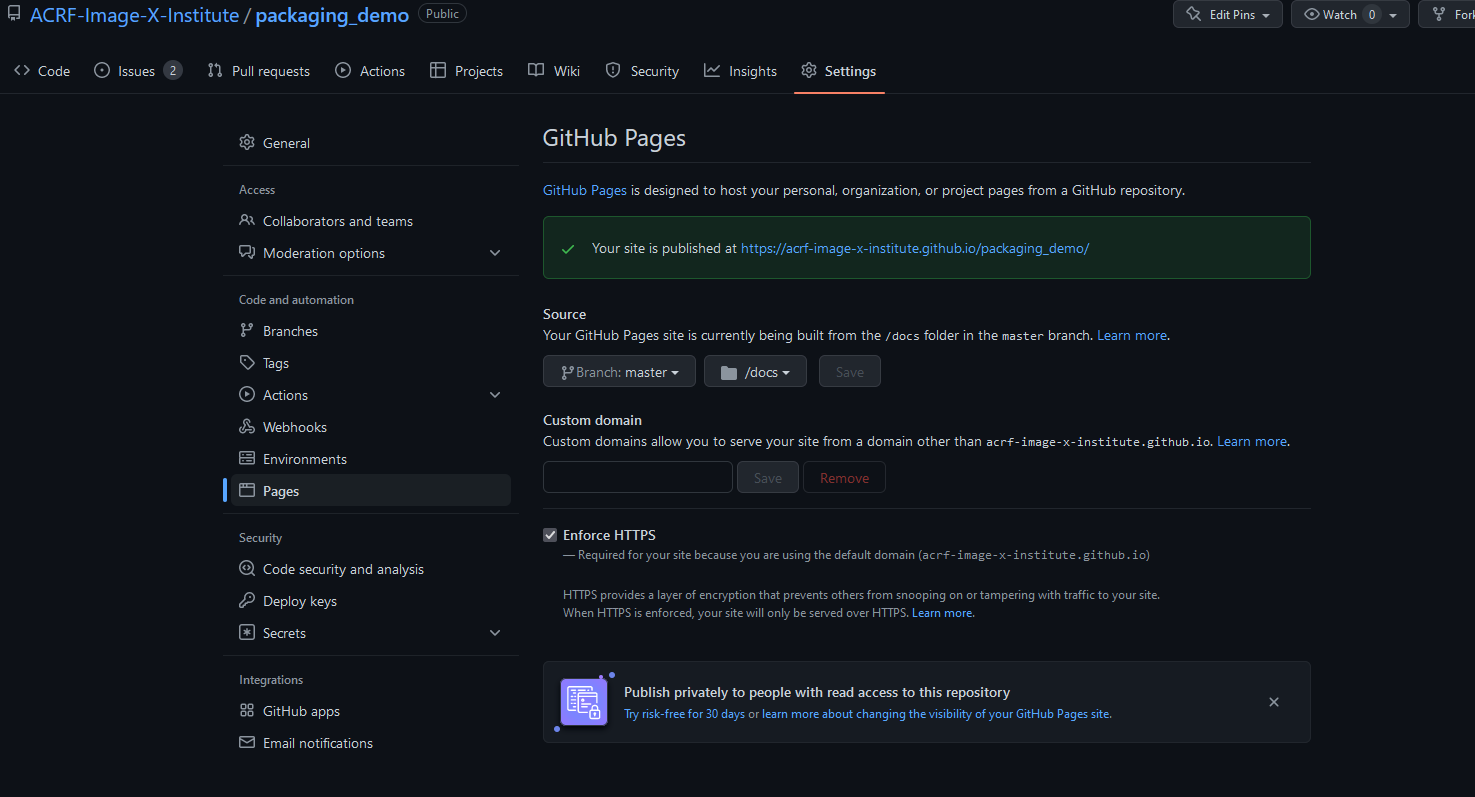
To host the html inside docs on github, go to settings, then find the pages section and set it up as in the screenshot below:

That’s it!
adding a link to the new webpage to github
A website isn’t very useful unless people know where to find it!
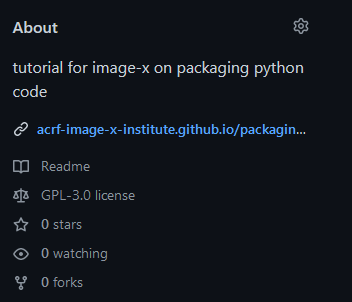
the conventional spot to put a link to your project webpage is in the top right hand corner of the repo:

To update these section, just click the little gear icon and copy the link from the section above.
changing html theme
One of the cool things about having your docs in html is that it’s super easy to control the way html looks through the use of cascading style sheets, or css.
To change your sphinx theme, open up the conf.py file, find the html_theme parameter, and pick a new one. You can browse all available themes here. Note that in general, you have to install a theme as well for it to work. if time, demo this with auto-docs